New SharePoint site to support the Design and Delivery of Online and Blended Learning

Modern science or technology abstract background. Cyberspace surface illustration. Vector.

Introducing the Digital Education Hub

The Digital Education Hub is a new SharePoint site created to support colleagues in the design and delivery of online and blended learning.

The Hub brings together practical and technology-enhanced guidance, with examples and resources all in one place – making it easy to access support. It can be used when designing a new course or CPD programme, developing online activities, refreshing existing content, or for exploring different approaches to teaching and learning.

You’ll find step-by-step guidance, templates, examples of practice, and support for using digital tools or platforms at the point of need. The Hub is intended to support colleagues involved in teaching and course development, regardless of experience level.

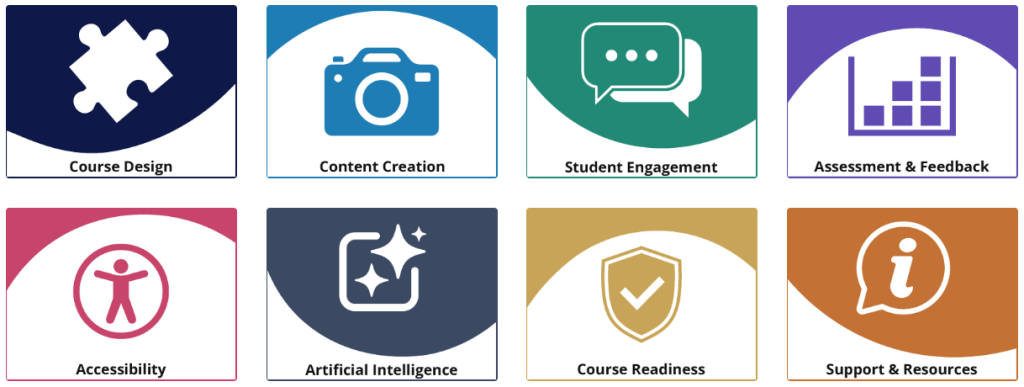
Menu / Sections: Course Design, Content Creation, Student Engagement, Assessment & Feedback, Accessibility, Artificial Intelligence, Course Readiness, Support & Resources

What you’ll find in the Hub

The Hub is structured around key aspects of digital education. It includes guidance on planning and structuring courses, creating engaging content, and encouraging student participation in both asynchronous and live settings. You’ll find advice for designing assessment and feedback, and for making content accessible and inclusive. There is also guidance on course readiness to support reviewing and sense-checking courses before launch, alongside templates, tools and further support.

How to use the Hub

You can use the Hub in a way that suits your needs:

  • Work through sections step-by-step when designing a new course
  • Dip into specific topics for quick guidance
  • Use templates and checklists to support planning and review
  • Revisit sections as part of ongoing course development

The Hub focuses on small, actionable guidance to assist colleagues in designing clear, consistent and well-structured online and blended learning. This includes aligning learning outcomes, activities and assessment, making effective use of digital tools, and ensuring content is accessible and easy to navigate.

The Hub’s guidance is intended to be practical and flexible – you don’t need to use everything, just what’s most helpful for your context.

Explore the Hub

Visit the Digital Education Hub (SharePoint site, UW login required).

We recommend adding the site to your
favourites or following it in SharePoint so it’s easy to find again and remains visible in your navigation.

Gif showing how to select 'Following' in SharePoint

While the Hub provides an on-demand resource, the TEL team are also here to offer one-to-one assistance where needed. If you’d like to talk through your course or project, or explore how the Hub can support your teaching, please feel free to get in touch: tel@worc.ac.uk

New SharePoint site to support the Design and Delivery of Online and Blended Learning Read More »


Planning Ahead: Moving Your Blackboard Class Collaborate Recordings to Panopto

You may be aware that conversations are currently ongoing about the future of Blackboard Class Collaborate and the move to Microsoft Teams for online teaching. While no final decisions have yet been confirmed, now is a good time to ensure that any Class Collaborate recordings you wish to keep are safely stored elsewhere.

To help safeguard your teaching materials, we strongly recommend downloading your Blackboard Class Collaborate recordings and uploading them to Panopto for future use. This blog post outlines the steps involved in the process.

What you will need

Before you begin, please ensure you have access to the following:

  • The Blackboard Class Collaborate session recordings that you wish to retain
  • A Panopto link added to your Blackboard module
  • Sufficient space on your computer to download and temporarily store the recorded files

If the Panopto LTI link is not already present in your Blackboard module, you will need to add this before uploading your recordings, which can be added through the content market.

Step 1: Download your Blackboard Class Collaborate recording

  1. Log in to Blackboard and open the relevant module.
  2. Click the three dots (⋮) next to Class Collaborate and select ‘view all recordings’.
Under Details & Actions - 'View all recordings' option shown within the 'Class Collaborate' three dot menu.
  1. Locate the recording you want to save.
  2. Click the three dots (⋮) next to the recording and choose ‘Download’.
  3. The recording will download as an MP4 file to your computer.
Drop-down menu options shown, with 'Download' highlighted.

Step 2: Upload the recording to Panopto

  1. Click on the Panopto website link within your Blackboard module.
Course Content - 'Panopto Website' link
  1. Navigate to or create a folder for the module’s recordings. You can use your existing module folder if this is already set up.
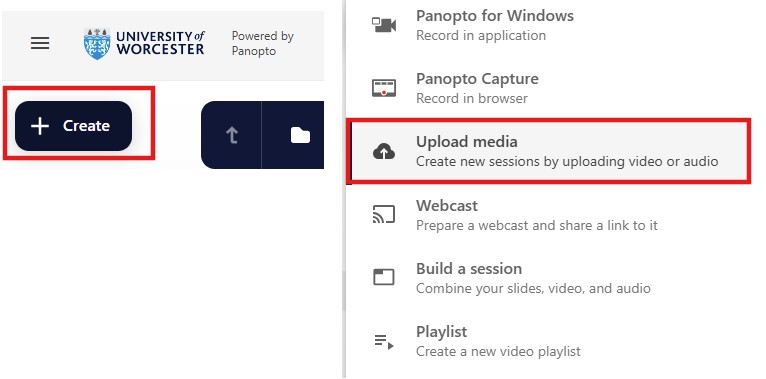
  2. Select Create > Upload media:
'Create' button shown on left and the 'Upload Media' option shown in the main menu on the right.
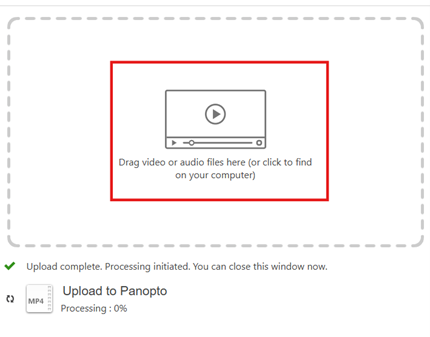
  1. Drag and drop the downloaded MP4 file or browse to select it.
Drag and Drop 'Upload to Panopto' window
  1. Wait for the file to upload and finish processing.

After your recording appears in Panopto, you may want to check playback to ensure the audio and video are correct.

Your recording will now be available in Panopto for students on the module to view.

We recommend completing this process before August, particularly for any recordings you may need again in the future. Once the future of Class Collaborate and Teams has been approved, we will communicate the outcome.

Need help or want someone to walk you through it?

If you would like support with downloading or uploading recordings, or advice on managing your Panopto content, please contact TEL@worc.ac.uk or book a 20 minutes with TEL appointment via MS bookings.

Planning Ahead: Moving Your Blackboard Class Collaborate Recordings to Panopto Read More »

AI Knowledge Checks in Documents

The Blackboard ‘Document’ tool now includes a new AI feature for Knowledge Checks. This option enables you to either enter a question manually or autogenerate a question using the built in AI knowledge check generator. Knowledge Checks in Blackboard enhance the learning experience, they allow students to access and engage with content, then receive immediate feedback. Tutors can also view the students’ responses.

How to use documents created elsewhere

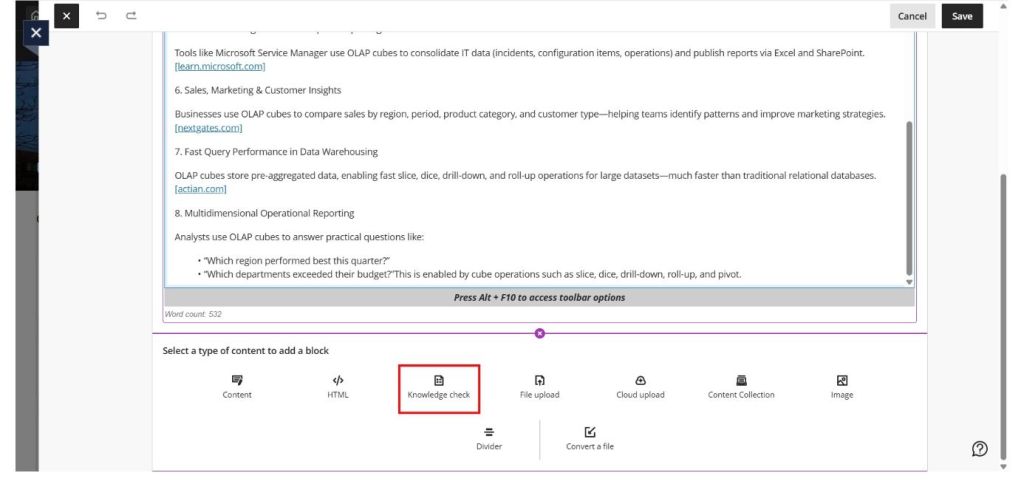
'Convert a file' option highlighted under 'Select a type of content to add a block'.

Tutors can convert word, pdf or PowerPoint files directly into html format using the Blackboard ‘Convert a file’ option.

Converting a file in this manner will result in a more accessible experience for students. Once the file has been converted, any additional formatting can be added from the formatting tool bar.

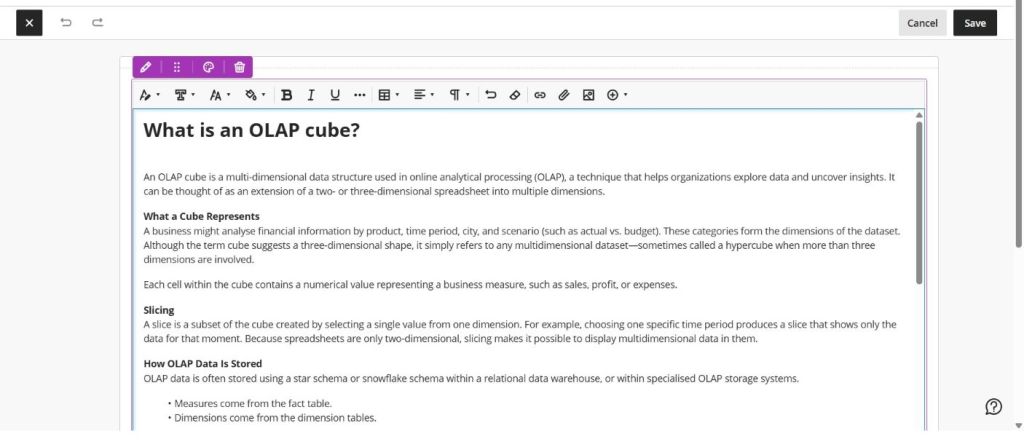
Example of a converted file.

How to add a Knowledge Check

Once the file has been converted, a knowledge check can be added to the document.

'Select a type of content to add a block' - 'Knowledge check' option highlighted.

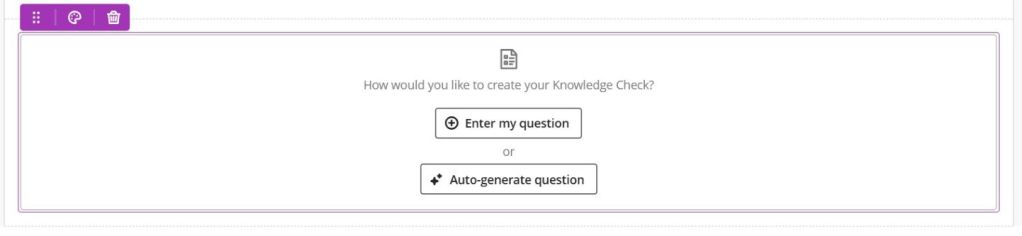
You can create your own question or use the built in ‘Auto-generate question’ tool to create one for you. (Auto-generated questions use the Blackboard AI Design Assistant.)

'Enter my question' or 'Auto-generate question' options shown.

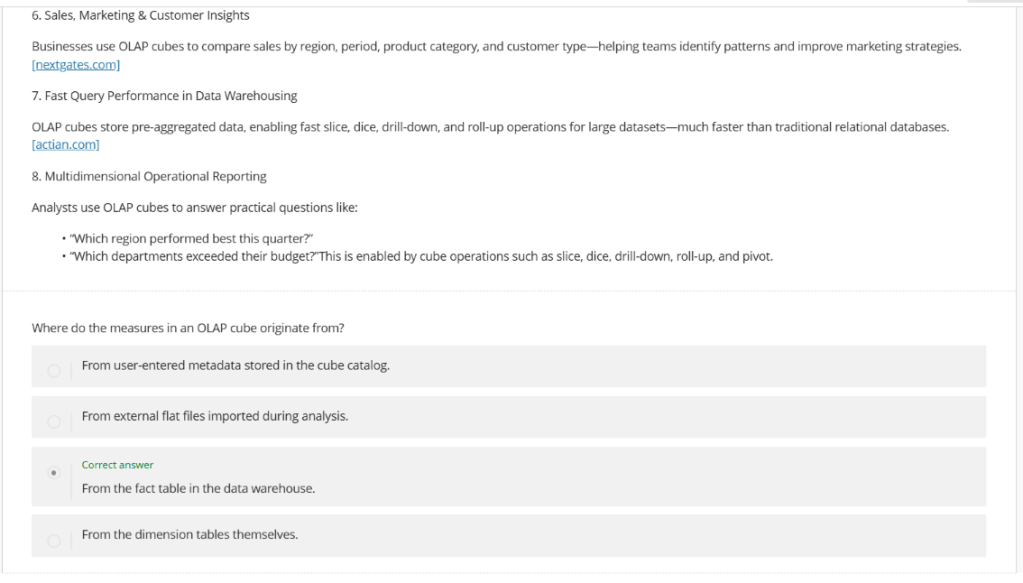
The question will then appear at the end of your converted document.

Examples of auto-generated questions based on content.

AI Knowledge Checks in Documents Read More »

PebblePad Alumni Accounts for students

PebblePad Logo 2025

If you are a tutor who teaches students who are using PebblePad, you may want to remind your final year students that they can take a free PebblePad alumni account.  

Students who have used PebblePad during their studies may want to retain the work they have done for the purposes of CPD when they leave the University. They can do this by creating an alumni account, when they are about to leave the University. Work in the student’s University account will then be copied into their alumni account, and for this reason it is recommended that students do not create the alumni account until they are ready to leave the university. There is no charge for an alumni account. This PebblePad guide provides further information about Alumni accounts.

To maintain access to their alumni account, students should use a personal email address which they intend to keep for the foreseeable future. 

PebblePad Alumni Accounts for students Read More »

Recording in-class presentations for assessment

Three people: one with a camera recording the person in the centre. the third person holds a director's megaphone.

Recently we have seen an increase in queries about recording student presentations for assessment. As ever, a Blackboard submission that uses Panopto is the best option for student submissions. However, what about recordings for presentations in-class? There are a couple of options available.

Manual recording

This is the method that most staff have used historically. Many schools have their own video cameras, and staff can borrow these to record the student presentations and share with external examiners via OneDrive or SharePoint. Recordings can either be stopped after each student, or one long recording can be made, and the timestamps noted for external examiners.

The advantage of this process is that it’s relatively straightforward and easy for staff to implement. Most schools have cameras to borrow, most often via PAS teams or Technicians, and extracting the videos and sharing by OneDrive or SharePoint is fairly simple.

The disadvantages are that using OneDrive relies on the sharer being available for the duration of the moderation process. If that person is on annual leave or sick, any issues with the files or sharing process are difficult to resolve. If the sharer leaves the university altogether, their OneDrive account will be taken down, and the recordings could be lost.

Video files could be uploaded and located in a SharePoint site, to allow all members access. We recommend contacting Digital Services for support with SharePoint. However, sometimes External Examiners can encounter issues accessing links and content in SharePoint too.

Using Panopto

As an alternative, we have designed a workflow to record via Panopto within your Blackboard module. The tutor is logged in and the recordings sit in a private area within the Blackboard space.

The advantages of this process are that the recordings will be held within the Blackboard module, meaning that any member of staff, including external examiners will have access, without the students being able to see them. The steps are contained in one process, with little follow-up. The process can work from any room, even those without Panopto video recording, although this will require a webcam.

This approach is quite versatile and can meet the needs of a range of assessment approaches. If you would like to know how to do this, please sign up for our training session on Wednesday 29th April, 13:30-14:30. You can book a place via iTrent under Learning, and selecting the type ‘Technology Enhanced Learning’.

If you have any questions, please email us at TEL@worc.ac.uk

Recording in-class presentations for assessment Read More »

Introducing the new Blackboard AI Conversation Tool

Man typing at a laptop, with the image of an android floating above.

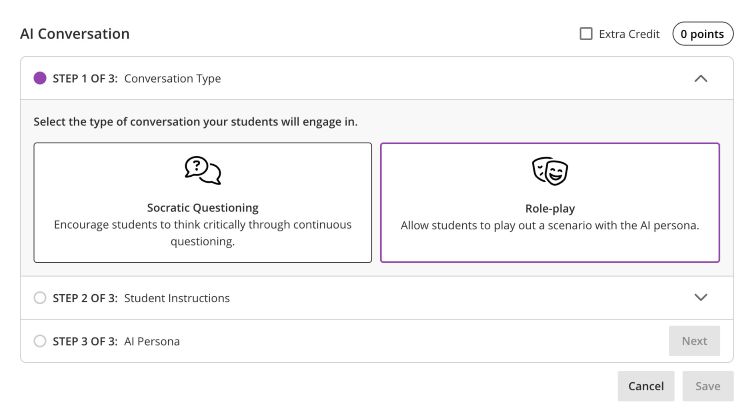
Blackboard instructors now have access to a new AI Conversation tool that supports both ‘Socratic Questioning’ and ‘Role-play’ scenarios. This feature allows students to interact with an AI persona to explore ideas, ask questions, and practise responding to realistic situations.

In Socratic questioning mode, students can ask questions about a specific topic and build their understanding through guided interaction.

Students can also take part in a simulated scenario with an AI-generated character using the Role-play tool. This can be particularly useful for practising professional conversations, decision-making, or problem-solving in a safe environment.

AI Conversions Step 1 of 3 as displayed on screen.

Setting up a Role-play conversation

Creating a role-play activity involves two main stages.

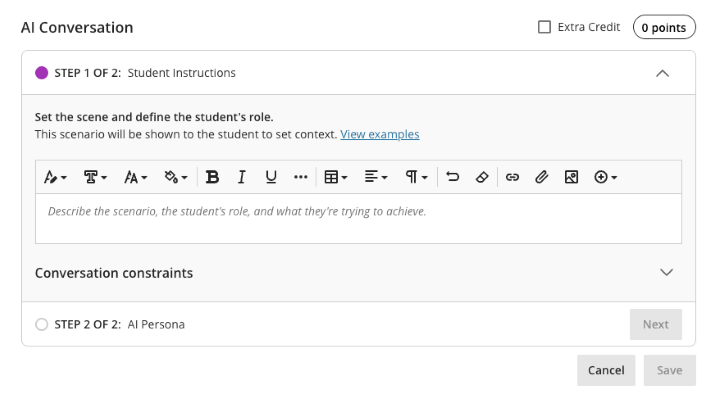
1. Set the scene and define the student’s role

  • Describe the scenario
  • Explain the context
  • Define what the student is trying to achieve
AI Conversation Step 1 of 2 for the Role Play option. 'Set the scene and define the student's role'.

2. Create the AI persona

  • Upload a profile image for the AI ‘character’
  • Give them a name
  • Define their personality and behaviour
  • Provide instructions for how they should respond
  • Set the complexity of the responses they will give

Automatic setup

You can also automatically generate a conversation scenario using documents uploaded to the system. The tool can use a range of file types, including PDF, Word, PowerPoint, text, RTF, and HTML files, to help create a conversation based on existing course materials.

Testing

Before releasing the activity to students, you can preview the conversation yourself by interacting with the AI persona. This allows you to check that the responses behave as expected and refine the scenario if needed.

Reviewing Student Interactions

As an instructor, you can review AI conversation transcripts to see how students engaged with the scenario and how they approached the discussion.

Further Information

More details about setting up the Conversations tool can be found on the Blackboard AI Conversation support page.

AI Data Usage and Security 

As an integrated feature within Blackboard, the AI Conversation tool does not use your course data to train or improve external AI models. More information about this can be found on Blackboard’s Trustworthy AI Support pages.

Introducing the new Blackboard AI Conversation Tool Read More »

Teams for Teaching: We Need Your Feedback 

We’re starting the process of moving from Blackboard Class Collaborate to Microsoft Teams, and we’d really value your input. In its place, we’ll be supporting the Microsoft Teams integration within Blackboard as the primary tool for online teaching, tutorials, and live sessions. 

Many of you are already using Teams for learning and teaching and we’d like to hear more about your experiences so far. To help us understand what’s working well (and what isn’t), we’ve put together a short questionnaire.  Your feedback will play a key role in shaping the support, resources, and training we provide over the coming months.

Thank you for taking a few minutes to share your thoughts.  

Teams use within Teaching and Learning – Fill out form

Teams for Teaching: We Need Your Feedback  Read More »

Turnitin Tips for Tutors – Student Queries

Turnitin Support for your Students

As promised, here is a follow up blog post for Academic staff, focused on troubleshooting potential student queries and information about how to signpost issues to TEL.

The TEL Unit have a Turnitin help page for students, which tutors are welcome to share. The page contains resources and FAQs for common issues:

Turnitin Student Support and FAQs – Technology Enhanced Learning Unit

5 Student Turnitin Problems and Solutions:

  1. Turnitin will not open due to an error message or internet connectivity:

If an error message appears or Turnitin fails to load up, this is usually due to browser or internet problems. Please signpost students to TEL tel@worc.ac.uk for support. Or to our Turnitin Student Support page. (Students need to ensure ‘third-party cookies’ are enabled for the Blackboard VLE https://worcesterbb.blackboard.com for Turnitin to open correctly. We recommend Chrome or Mozilla Firefox browsers.)

It is helpful if students provide us with a screenshot of the issue, if possible. However, if the due date is imminent, tutors can choose to accept an email copy of their student’s assignment and submit on behalf of the student instead.

  1. The submission point will not open or displays an error message – due to the ‘Open in New Window’ setting being applied:

For some devices, if the Turnitin assignment submission point is set to open in a new window this can prevent access. For this reason, the default option in Blackboard is for Turnitin not to open in a new window for students. If you have added the ‘Open in new window’ setting, we recommend unticking this choice, by using the Blackboard three-dot menu for the Turnitin submission point:

  1. A student cannot make a Late Submission to the original point:

The Late Submission setting allows students who have not been able to submit ahead of the due date and time to make one late submission in total. If a student has accidentally submitted an incorrect version of their assignment, either before the due date has passed or afterwards, it will only be possible for students to make a further late submission if a tutor intervenes. Tutors can contact us at TEL for support, as there are workarounds if you would like the student to have the opportunity to make another normal late attempt.

We have advice for the different types of Late Submissions in our Turnitin manual – for normal Late submissions, Resubmissions or Mitigating Circumstances.

  1. A Student has submitted the wrong assignment to the submission point by mistake:

When the recommended settings are applied, if the due date has not yet passed, students can resubmit as many times as they wish up until this time. There is no need to remove a submission, as a new submission will overwrite the incorrect document. The previous incorrect version will not be compared for similarity checking.

However, if the due date has passed and a student has already submitted, they will not be able to make a further late submission (as described above). Students are not able to remove a submission themselves but module leaders can assist. Please feel free to contact the TEL Unit if you would like advice as a tutor.

Sometimes a student may have accidentally submitted an incorrect assignment to the wrong module, as well as to the correct submission point – If this has happened, please contact TEL tel@worc.ac.uk. Both module leaders will need to be made aware if the due dates have passed. If the submission points are summative, there will be a high similarity score match for self-plagiarism. (Self-matches could later be filtered out using the ‘Exclude Sources’ button by tutors: Originality Report.)

  1. Students cannot resubmit, but the due date has not yet passed:

We recommend checking the option Generate reports immediately (students can resubmit until due date) has been chosen. (This option also allows students to view similarity reports before the deadline is reached.)

Unfortunately, it is easy to accidentally select a different choice here, due to the use of a drop-down menu. It is possible to alter this Optional Setting in Turnitin, by selecting the cog in the top right-hand corner. Please see our Checking or Changing the Settings guidance.

If Academic staff or students need any support with Turnitin, please do not hesitate to contact us at TEL tel@worc.ac.uk.

Turnitin Tips for Tutors – Student Queries Read More »

PebblePad Support for Students and External Assessors

PebblePad Logo 2025

The TEL Unit (Library Services) provide support for PebblePad, a personal learning system that is used for portfolios and practice assessments. All staff and students have their own account which can be used for recording personal development and continuing professional development activities. The TEL Unit offer training and support with PebblePad, this can range from student orientated workshops, advising staff at a departmental level, or 1:1 advice for PebblePad users. 

At this time of year, we are aware that many students are using PebblePad while out on placements. We would like to make sure staff and students know where to get help with PebblePad by sharing some handy troubleshooting tips. We recommend tutors should be the first point of contact if a student experiences any PebblePad problems, but the TEL team are always happy to assist from a technical point of view.  

  • Students can contact the TEL team by email tel@worc.ac.uk for direct support -TEL office hours are Mon- Fri, 9am to 5pm. 

External assessor shares: 

Often students need to share their submitted PebblePad assignment with a placement assessor outside of UW.  

  • After students share in this way, external workplace assessors will be able to see an ‘Assessor’ view of a workbook / ePortfolio, to complete the sections they need to edit. (Likewise, students will see parts which they can only edit in their view.)  
  • UW Academic Tutors who have access to a workspace can view students’ submissions from their managers dashboard (so external assessor shares are not required).

External assessor PebblePad emails: 

  • If assessors have any problems finding PebblePad emails, they can contact TEL tel@worc.ac.uk for further support, or students can do this on their behalf.

Editing Issues and the new External Assessor Dashboard: 

  • If a student has accidentally made an incorrect type of share, they can remove this by using the trash can option. – Most often these are ‘with people’ shares, which will give a ‘read-only’ like view of a workbook or ePortfolio. PebblePad have helpful instructions to delete ‘with people’ shares: Share an asset with people | Learners – Using PebblePad : Help Hub 
  • If a workplace assessor can log into their External UW PebblePad account, and an external assessor share has been successful – they should be able to see an assessor’s view under ‘Items shared for assessment’. This will be visible from their external account dashboard: External dashboard | Externals – Using PebblePad : Help Hub 

If there are any other technical PebblePad problems, Students or External Assessors can contact TEL, using the same email address which their UW PebblePad account is linked to, along with all the relevant details. 

If assessors have any issues viewing an external assessor share link, or accessing their External UW PebblePad account, assessors and students are welcome to send a message to us at TEL: tel@worc.ac.uk  

PebblePad logo

PebblePad Support for Students and External Assessors Read More »

Turnitin Tips for Tutors

With the semester well underway we thought it would be useful to share helpful advice for common Turnitin queries. Staff are welcome to contact us at TEL tel@worc.ac.uk, for any technical assistance with Turnitin issues. Whether you need a hand with settings, information about rubrics and grading, or if your students require help with a problem.

5 Staff Turnitin Problems and Solutions:

  1. How to Check or Change the Settings:

Ahead of students submitting their work, we recommend checking your Turnitin settings for individual submission points. If you are a newer member of staff, you can refer to our Submission Point guidance. New or existing staff can contact the TEL Unit for any Turnitin training needs.

  1. Changing the due date and time:

Certain Turnitin settings are greyed out once a submission point has been created. It is possible to change the due date and time in Blackboard instead: Checking or Changing the Settings

  1. Anonymous Marking:

Anonymous Marking is an optional setting which can be applied up until the first student submission attempt. Unfortunately, after students have begun to submit, it is then not possible to add this setting. If there is time, you could instead create a new submission point to allow students to resubmit anonymously.

If you need to reveal a student’s name in an anonymous assignment, please see our Turnitin Guide: Academic Integrity

  1. Turnitin Rubrics:

We have the following instructions for creating Rubrics and for Exporting and Importing Rubrics: Exporting Rubrics. Once created rubrics belong to an individual user’s account, so the only way to share a rubric is through exporting them as a .rbc file. If Rubric (.rbc) files need to be available for different staff members to use in Turnitin, these could be saved in a central location to store securely, and make them easily accessible to course teams. (Such as a SharePoint site – in case of staff absence, or if a staff member later leaves the University.) Please be aware that .rbc files will not open in other applications; just Turnitin. So, the files can only be stored, but not opened or viewed elsewhere.

  1. Similarity Report Queries:

We have guidance for Similarity reports in Turnitin, Submission Point – which includes our recommended ‘Similarity Report’ settings, the default ‘Compare against’ settings and how to ‘Exclude assignment template’ (if you have used one) from similarity matches.

‘Optional Settings’ in Turnitin allow you to choose to store papers in the ‘Standard paper repository‘ if this is a summative assessment, or ‘Do not store the submitted papers‘ if it is for formative use. When papers are stored in the ‘Standard Paper repository’, this means they are held in the ‘Global Turnitin Repository’. With the recommended assignment settings, students can view their similarity reports after each submission attempt, however, on the fourth submission they will need to wait 24 hours for the next similarity report to generate. Shortly after the due date and time has passed, Turnitin will run an additional ‘collusion check’, comparing all students’ submissions for the assignment.

For interpreting Similarity matches our TEL Turnitin guide gives an overview: Originality Report. This includes how to:

  • Use the ‘Exclude sources’ button,
  • Re-add sources back in
  • Or how to alter filters for an assignment by adjusting thresholds to run a ‘New Report’ – if needed.

The Turnitin integration in the VLE uses the Feedback studio, ‘Classic’ similarity report view: Turnitin Online Guide: Navigating the Similarity Report – Turnitin Guides.

Please feel free to contact TEL tel@worc.ac.uk if you have any questions about similarity report anomalies. If required, TEL can also contact Turnitin UK directly.

*A note about Self-Plagiarism matches in the VLE: Turnitin is designed to find matches for self-plagiarism for Turnitin assignments held in different Blackboard modules, but self matches are normally automatically filtered out for different submission points within the same Blackboard module.

Our main TEL Turnitin resources and support pages are:

Staff:

Students:

We will send out a follow up Turnitin Blog post later this semester, which will focus on common student queries that academic staff may encounter. It will include extra troubleshooting fixes and information about where to sign-post students for further technical advice from TEL. Please continue to contact TEL tel@worc.ac.uk with any staff or student Turnitin problems.

Turnitin Tips for Tutors Read More »