Rather than uploading your files directly to Blackboard, you may want to consider using the ‘Convert a file’ option:
Select Create, Document, then ‘Convert a file’
Browse for your files on your PC.
Once selected, the system converts the file into the Document format.
Supported file types include PDF (.pdf), PowerPoint (.ppt, .pptx, .pps), or Word (.doc, .docx, .odt).
Converted content should be reviewed for accuracy
Why use a Blackboard Document?
Blackboard documents are more accessible than uploading files because they are designed as native, responsive web pages (rather than attachments). The documents will also use a more standardised font style, so provide consistency across your Blackboard module.
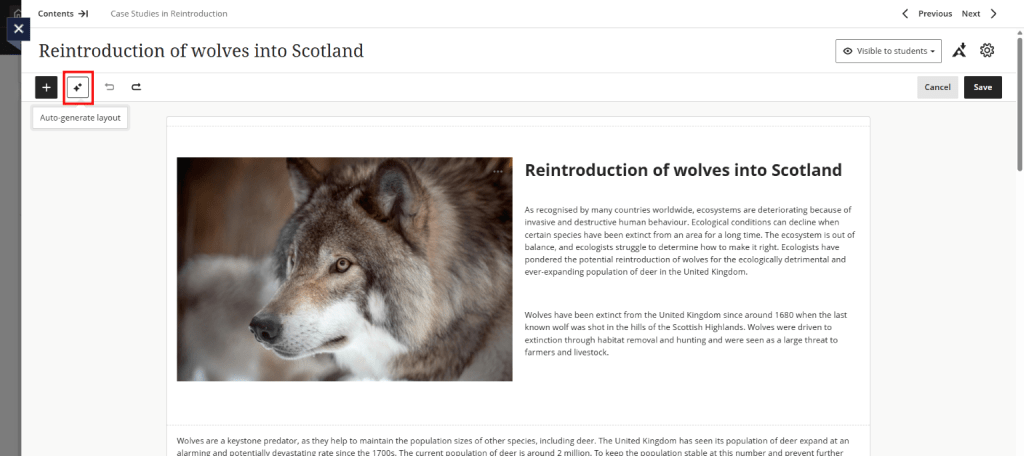
In a document that already has content, select the auto-generate icon (shown in red above). This optimises the layout, reorganises text or image content, and optionally creates a knowledge check.
Select the Auto-generate layout icon.
Review the layout and adjust as needed.
You can select Settings and update options, such as, which images are included, or if a knowledge check is needed.
The TEL Unit have put together some tips and advice for students who wish to obtain copies of their work and feedback from tutors.
Staff are welcome to share this information with their students.
Guidance for Students – Downloading Assessments
While you are a current University of Worcester student, any assignments which you have uploaded to the Blackboard VLE or Turnitin can be downloaded at any point for your own records.
This is particularly important if you are a student who is finishing your course:
We recommend storing any copies of your work securely – outside of the Blackboard VLE or your Microsoft student account. You will need to use personal file storage options instead after leaving the University.
You may wish to keep a back-up copy for the future too. For example, if your device should have any issues.
Turnitin Assignments
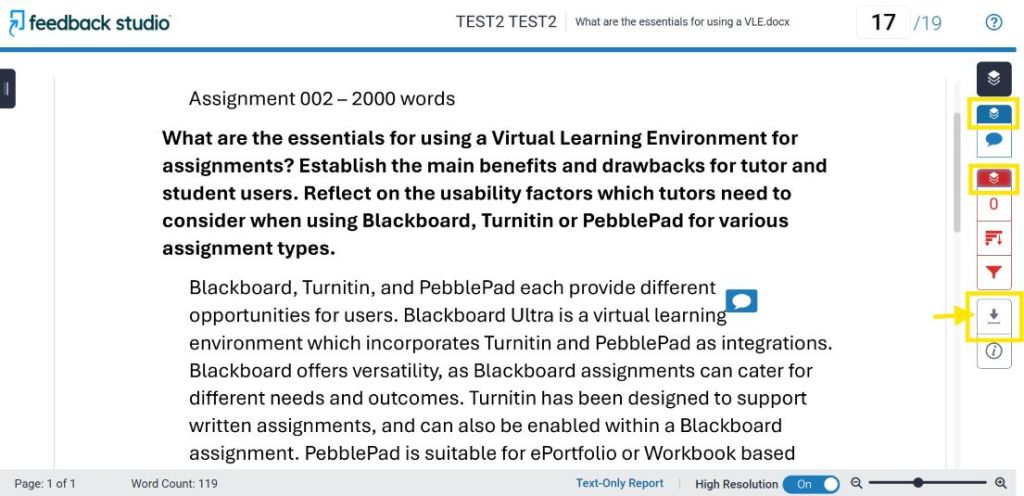
Access uploaded work through a Turnitin submission link in Blackboard. You can select your assignment title to review your work.
Once you have opened your assignment, ensure you have the feedback and similarity layers activated. (You can use the blue and red buttons on the right.)
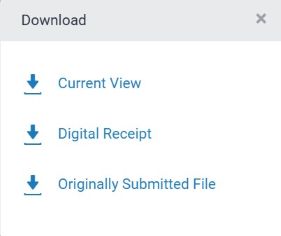
Then click the grey download arrow to show the different options to select:
Current View
This will download as a .pdf file document
Digital Receipt
Shows the time and date of submission
Originally Submitted File
Your work as you uploaded it
We recommend choosing to download the Current View with layers showing, if you would like a copy of your assignment, similarity matches, grade, and feedback.
The downloaded ‘Current View’ .pdf file will contain:
Submission details
Your Assignment
Originality Report (Similarity checks)
GradeMark Report (Grade and Feedback comments)
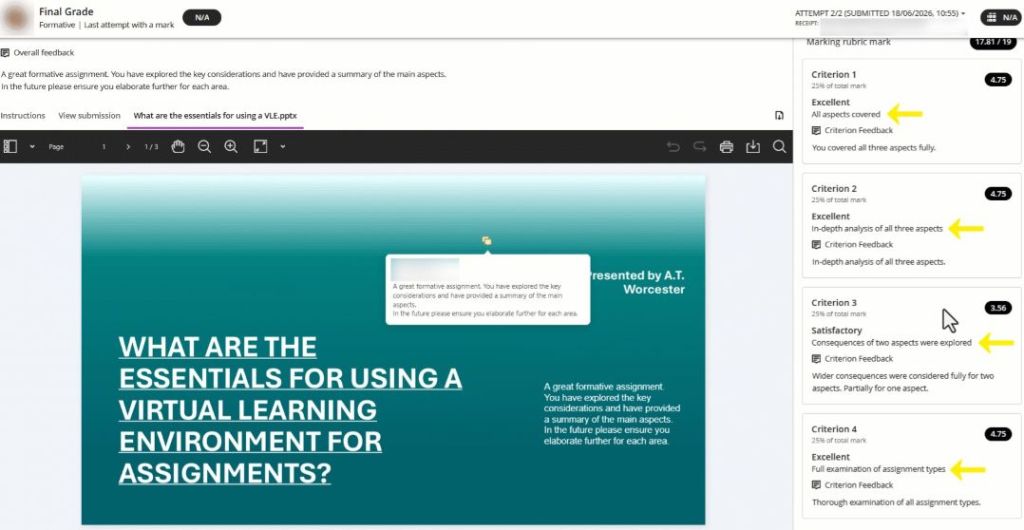
Your feedback and grade can be found at the end of the .pdf document:
Within your Assignment / the on screen document view:
Document Annotations and Comments
Comments can show as a Speech Bubble / Callout
Or as typed text
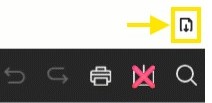
4a and 4b- Comments / annotations are included in a .pdf download of your work. Clicking on / hovering over the speech bubble reveals comments. You can select the large download arrow in the tool bar options to get a .pdf file copy of your work and feedback:
Audio or Video Feedback
Sometimes, tutors may include Feedback Recordings. (It is not possible to download recorded feedback from Blackboard.)
Downloading Blackboard Assignments with Turnitin enabled
For other written feedback, it is not possible to download a copy straight from Blackboard. You could instead copy and paste tutor comments into a new document on your computer. Or take a screenshot for your own records to store outside of the VLE.
Embedded Video Assessments
Embedded video assignments are not stored in Blackboard, so cannot be downloaded from here as they are held in Panopto.
Further support
Please contact your tutors if you cannot see your work or feedback, but please also feel free to contact TEL for technical support: TEL@worc.ac.uk
Following a review of tools used for online teaching, the University has agreed to move from Collaborate to Microsoft Teams. This decision was confirmed at LTSEC on 20 May.
Our current contract with Collaborate will end in August 2026, after which Teams will become the University’s primary platform for online teaching from 1 September 2026.
The decision reflects a balanced assessment of several factors. While cost and long-term value were important considerations, it was equally significant that the core teaching functionality offered through Collaborate is now available within Teams. This provides a more integrated, familiar environment for both staff and students, bringing online teaching into the same platform already widely used for collaboration across the University.
It was also recognised that continuing with Collaborate would require a move to a newer version in the near future. This version differs substantially from the current system in terms of features and usability, meaning staff would be adapting to a significantly different platform regardless. Given this, transitioning to Teams now offers a clearer and more consistent direction.
Staff feedback has been a key part of the process. Many colleagues are already confidently using Teams for teaching, and overall sentiment supported the move. Where concerns were raised, such as managing student interactions, these can be addressed through appropriate configuration of Teams to ensure sessions remain structured and manageable.
What does this mean for me?
Staff will need to familiarise themselves with using Teams for teaching ahead of the new academic year. Support will be available to ensure a smooth transition. Digital Services and the Technology Enhanced Learning Unit will provide training, guidance, and resources for both staff and students over the coming months, with further details shared via the staff bulletin, TEL and Digital Services websites, and iTrent.
This change represents a positive step towards a more unified and sustainable digital teaching environment, with the tools, support, and flexibility needed to deliver high-quality online learning.
Semester 1 Modules are due to be created in Blackboard week commencing 8th June 2026. Modules will be available for staff to self-enrol on from the second week of June to allow time to develop new online course content for next year.
Migrating your Content
Intending to reuse materials from last year?
Once you have self-enrolled onto the newly created modules in June. You can follow our Copying Content guidance to bring across any content from another module you are already enrolled on, you will firstly need to be in the new empty module.
Differences between a ‘Course Copy’ and the recommended ‘Bulk Copy’
Copying an entire course will include all old announcements and assessments. Only use this option if you wish to copy everything on the Content page including Panopto videos that are not held in a learning module or folder.
If you do use the course copy option, we recommend removing any copied assessments and to create new assessments for the current semester / academic year instead.
On the other hand, the Bulk Copy option allows you to select folders using ‘Copy Items’. We recommend copying only the specific items that are needed using the Bulk Copy method. You can also choose to copy individual items at a more granular level.
Copying Videos
Each Blackboard module has a Panopto folder where video content for the module needs to be held. By storing videos in this folder, permissions are granted to all users enrolled onto the Blackboard module to view. If you need to check your module’s videos you can do this by using the Panopto website link. (The Panopto website link is useful for managing your module’s video content, we recommend keeping this hidden from student view.) If you cannot see a video listed in your module’s Panopto folder, you will need to ensure this is copied over. You can choose to upload and embed to Blackboard if any videos are missing. If you have any problems checking on the location of your videos, or ensuring videos are copied over, please do contact us at TEL tel@worc.ac.uk for further support.
A second blog post will follow (Part 2), detailing the different support available from TEL to assist colleagues with preparations for the new academic year. Part 2 is now available:Part 2: TEL Support for Module Rollover 2026
You may be aware that conversations are currently ongoing about the future of Blackboard Class Collaborate and the move to Microsoft Teams for online teaching. While no final decisions have yet been confirmed, now is a good time to ensure that any Class Collaborate recordings you wish to keep are safely stored elsewhere.
To help safeguard your teaching materials, we strongly recommend downloading your Blackboard Class Collaborate recordings and uploading them to Panopto for future use. This blog post outlines the steps involved in the process.
What you will need
Before you begin, please ensure you have access to the following:
The Blackboard Class Collaborate session recordings that you wish to retain
A Panopto link added to your Blackboard module
Sufficient space on your computer to download and temporarily store the recorded files
Step 1: Download your Blackboard Class Collaborate recording
Log in to Blackboard and open the relevant module.
Click the three dots (⋮) next to Class Collaborate and select ‘view all recordings’.
Locate the recording you want to save.
Click the three dots (⋮) next to the recording and choose ‘Download’.
The recording will download as an MP4 file to your computer.
Step 2: Upload the recording to Panopto
Click on the Panopto website link within your Blackboard module.
Navigate to or create a folder for the module’s recordings. You can use your existing module folder if this is already set up.
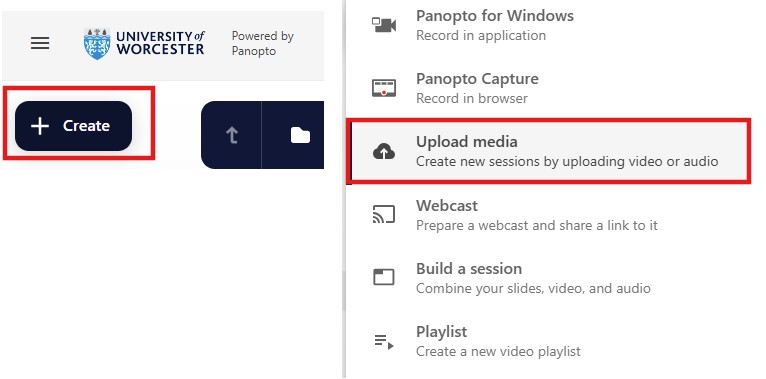
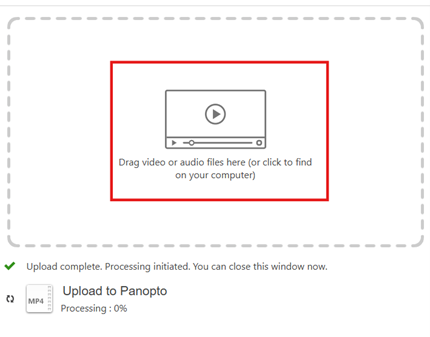
Select Create > Upload media:
Drag and drop the downloaded MP4 file or browse to select it.
Wait for the file to upload and finish processing.
After your recording appears in Panopto, you may want to check playback to ensure the audio and video are correct.
Your recording will now be available in Panopto for students on the module to view.
We recommend completing this process before August, particularly for any recordings you may need again in the future. Once the future of Class Collaborate and Teams has been approved, we will communicate the outcome.
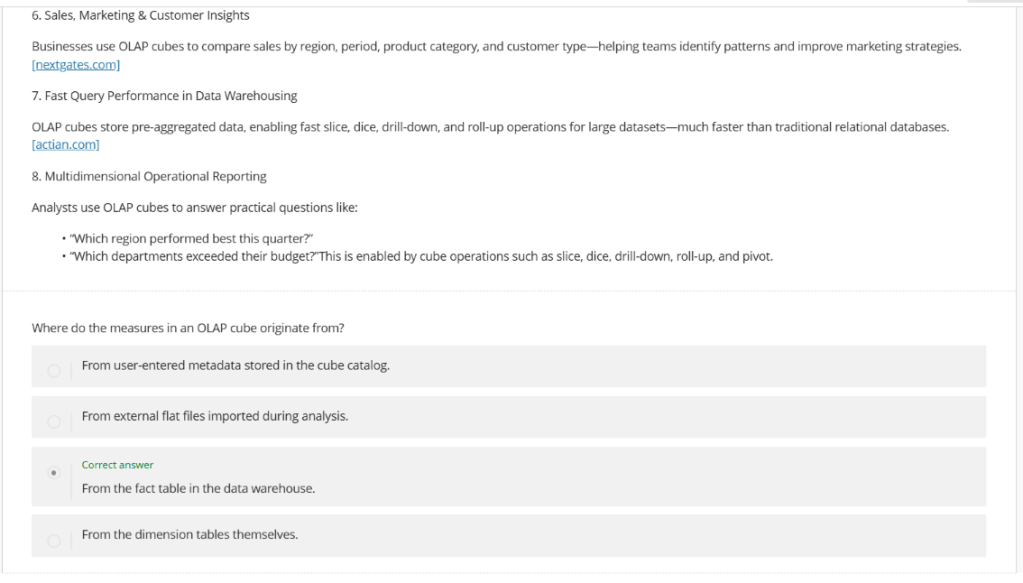
The Blackboard ‘Document’ tool now includes a new AI feature for Knowledge Checks. This option enables you to either enter a question manually or autogenerate a question using the built in AI knowledge check generator. Knowledge Checks in Blackboard enhance the learning experience, they allow students to access and engage with content, then receive immediate feedback. Tutors can also view the students’ responses.
How to use documents created elsewhere
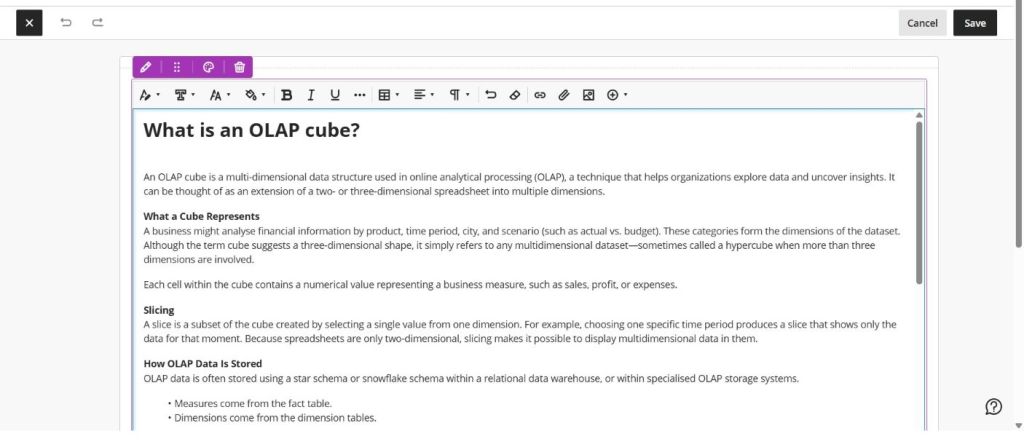
Tutors can convert word, pdf or PowerPoint files directly into html format using the Blackboard ‘Convert a file’ option.
Converting a file in this manner will result in a more accessible experience for students. Once the file has been converted, any additional formatting can be added from the formatting tool bar.
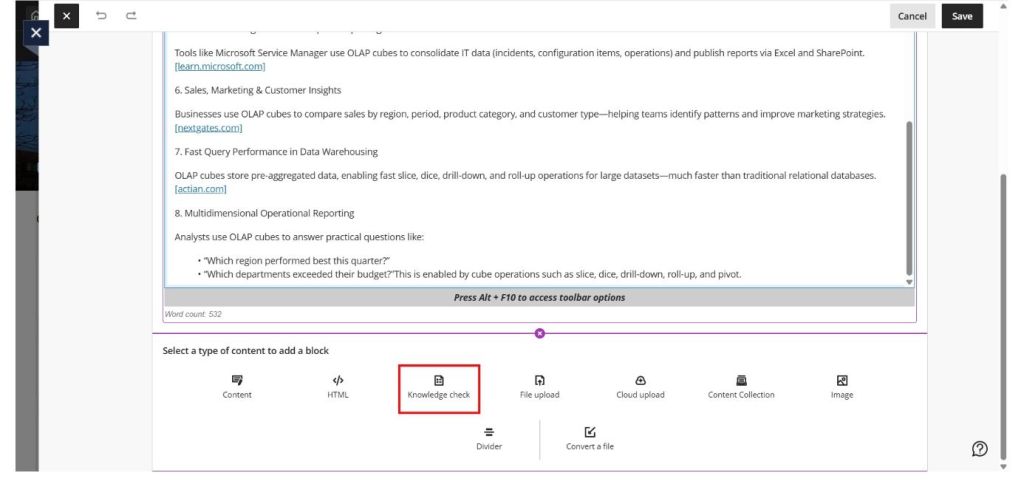
How to add a Knowledge Check
Once the file has been converted, a knowledge check can be added to the document.
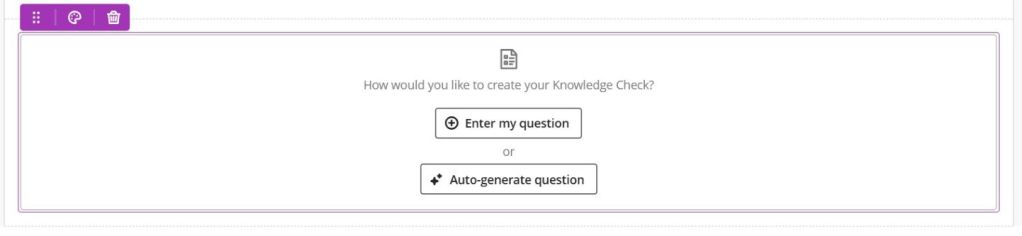
You can create your own question or use the built in ‘Auto-generate question’ tool to create one for you. (Auto-generated questions use the Blackboard AI Design Assistant.)
The question will then appear at the end of your converted document.
Recently we have seen an increase in queries about recording student presentations for assessment. As ever, a Blackboard submission that uses Panopto is the best option for student submissions. However, what about recordings for presentations in-class? There are a couple of options available.
Manual recording
This is the method that most staff have used historically. Many schools have their own video cameras, and staff can borrow these to record the student presentations and share with external examiners via OneDrive or SharePoint. Recordings can either be stopped after each student, or one long recording can be made, and the timestamps noted for external examiners.
The advantage of this process is that it’s relatively straightforward and easy for staff to implement. Most schools have cameras to borrow, most often via PAS teams or Technicians, and extracting the videos and sharing by OneDrive or SharePoint is fairly simple.
The disadvantages are that using OneDrive relies on the sharer being available for the duration of the moderation process. If that person is on annual leave or sick, any issues with the files or sharing process are difficult to resolve. If the sharer leaves the university altogether, their OneDrive account will be taken down, and the recordings could be lost.
Video files could be uploaded and located in a SharePoint site, to allow all members access. We recommend contacting Digital Services for support with SharePoint. However, sometimes External Examiners can encounter issues accessing links and content in SharePoint too.
Using Panopto
As an alternative, we have designed a workflow to record via Panopto within your Blackboard module. The tutor is logged in and the recordings sit in a private area within the Blackboard space.
The advantages of this process are that the recordings will be held within the Blackboard module, meaning that any member of staff, including external examiners will have access, without the students being able to see them. The steps are contained in one process, with little follow-up. The process can work from any room, even those without Panopto video recording, although this will require a webcam.
This approach is quite versatile and can meet the needs of a range of assessment approaches. If you would like to know how to do this, please sign up for our training session on Wednesday 29th April, 13:30-14:30. You can book a place via iTrent under Learning, and selecting the type ‘Technology Enhanced Learning’.
If you have any questions, please email us at TEL@worc.ac.uk
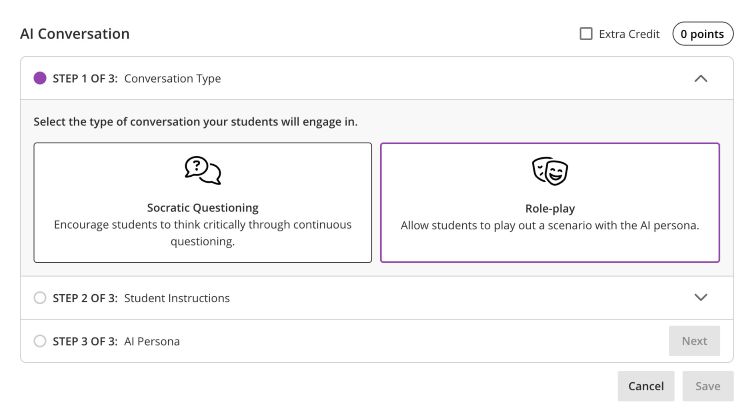
Blackboard instructors now have access to a new AI Conversation tool that supports both ‘Socratic Questioning’ and ‘Role-play’ scenarios. This feature allows students to interact with an AI persona to explore ideas, ask questions, and practise responding to realistic situations.
In Socratic questioning mode, students can ask questions about a specific topic and build their understanding through guided interaction.
Students can also take part in a simulated scenario with an AI-generated character using the Role-play tool. This can be particularly useful for practising professional conversations, decision-making, or problem-solving in a safe environment.
Setting up a Role-play conversation
Creating a role-play activity involves two main stages.
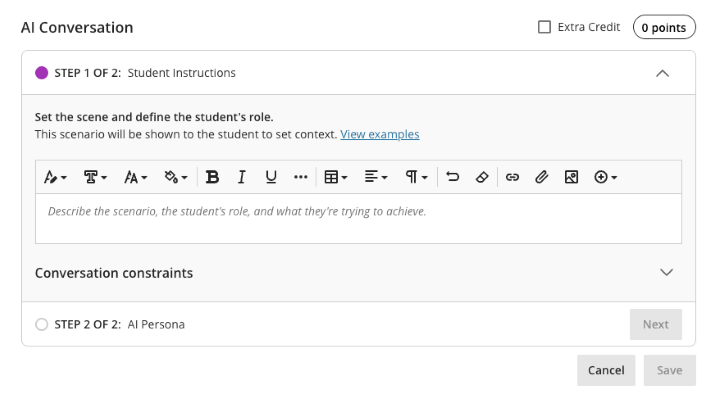
1. Set the scene and define the student’s role
Describe the scenario
Explain the context
Define what the student is trying to achieve
2. Create the AI persona
Upload a profile image for the AI ‘character’
Give them a name
Define their personality and behaviour
Provide instructions for how they should respond
Set the complexity of the responses they will give
Automatic setup
You can also automatically generate a conversation scenario using documents uploaded to the system. The tool can use a range of file types, including PDF, Word, PowerPoint, text, RTF, and HTML files, to help create a conversation based on existing course materials.
Testing
Before releasing the activity to students, you can preview the conversation yourself by interacting with the AI persona. This allows you to check that the responses behave as expected and refine the scenario if needed.
Reviewing Student Interactions
As an instructor, you can review AI conversation transcripts to see how students engaged with the scenario and how they approached the discussion.
Further Information
More details about setting up the Conversations tool can be found on the Blackboard AI Conversation support page.
AI Data Usage and Security
As an integrated feature within Blackboard, the AI Conversation tool does not use your course data to train or improve external AI models. More information about this can be found on Blackboard’s Trustworthy AI Support pages.
We’re starting the process of moving from Blackboard Class Collaborate to Microsoft Teams, and we’d really value your input. In its place, we’ll be supporting the Microsoft Teams integration within Blackboard as the primary tool for online teaching, tutorials, and live sessions.
Many of you are already using Teams for learning and teaching and we’d like to hear more about your experiences so far. To help us understand what’s working well (and what isn’t), we’ve put together a short questionnaire. Your feedback will play a key role in shaping the support, resources, and training we provide over the coming months.
Thank you for taking a few minutes to share your thoughts.
Online learning can sometimes end up looking like a sequence of readings and recorded lectures – especially when time is tight. While these resources are important, learning happens when students do something with the content – even in small, low-pressure ways.
This post shares a few simple approaches to designing online learning activities that move beyond ‘read and watch’, without adding significant workload for staff or students.
1. Designing discussion boards with purpose
Discussion boards can get a bad reputation, often because students are asked to ‘post something’ without a clear reason.
What works better:
giving students a specific task (e.g. apply, compare, critique)
making expectations clear (length, tone, whether replies are required)
framing the discussion as part of the learning process, not an add-on
Example ideas:
‘Post one example from your own experience that links to this week’s concept.’
‘Respond to one peer and explain how their example differs from yours.’
‘Summarise the key takeaway from the discussion at the end of the week.’
Small changes like this can turn a discussion board into a genuine learning activity rather than a compliance exercise.
2. Using quizzes for learning, not just assessment
Used formatively, quizzes can help students:
check their understanding
identify gaps early
build confidence before assessments
Low-stakes quizzes work particularly well when they:
allow multiple attempts
include feedback on why an answer is correct or incorrect
are clearly positioned as practice, not judgement
Even a short quiz with 5–10 questions can make learning more active and support retrieval and reflection.
3. Using low-stakes activities to encourage engagement
Not every activity needs to be assessed to be valuable. Low-stakes activities can help students engage with ideas without the pressure of marks.
These might include:
short polls or surveys
brief scenario-based questions
asking students to upload a single slide, paragraph, or example
self-checks or “pause and think” prompts embedded in content
These activities are often quick to set up but can significantly increase student interaction with course materials.
4. Supporting reflection and practice
Reflection helps students make sense of what they’re learning and connect it to prior knowledge or future practice.
Simple reflection activities might ask students to:
identify one thing they found challenging
explain how a concept applies to their discipline or professional context
note one question they still have
These can be:
private (e.g. learning journals)
shared in small groups
used to inform teaching or follow-up activities
Reflection doesn’t need to be long or formal – short, focused prompts are often more effective.
Bringing it together
Designing online learning activities doesn’t have to mean adding lots of extra content or complex tools. Often, it’s about:
being clear about what students should do
giving them opportunities to practise and reflect
using simple tools with intentional design
If you’re reviewing an online module, it can be helpful to ask:
Where are students actively engaging with ideas, not just consuming information?
We use cookies on our website to give you the most relevant experience by remembering your preferences and repeat visits. By clicking “Accept All”, you consent to the use of ALL the cookies. However, you may visit "Cookie Settings" to provide a controlled consent.
This website uses cookies to improve your experience while you navigate through the website. Out of these, the cookies that are categorized as necessary are stored on your browser as they are essential for the working of basic functionalities of the website. We also use third-party cookies that help us analyze and understand how you use this website. These cookies will be stored in your browser only with your consent. You also have the option to opt-out of these cookies. But opting out of some of these cookies may affect your browsing experience.
Necessary cookies are absolutely essential for the website to function properly. These cookies ensure basic functionalities and security features of the website, anonymously.
Cookie
Duration
Description
cookielawinfo-checkbox-analytics
6 months
This cookie is set by GDPR Cookie Consent plugin. The cookie is used to store the user consent for the cookies in the category "Analytics".
cookielawinfo-checkbox-functional
6 months
The cookie is set by GDPR cookie consent to record the user consent for the cookies in the category "Functional".
cookielawinfo-checkbox-necessary
6 months
This cookie is set by GDPR Cookie Consent plugin. The cookies is used to store the user consent for the cookies in the category "Necessary".
cookielawinfo-checkbox-others
6 months
This cookie is set by GDPR Cookie Consent plugin. The cookie is used to store the user consent for the cookies in the category "Other.
cookielawinfo-checkbox-performance
6 months
This cookie is set by GDPR Cookie Consent plugin. The cookie is used to store the user consent for the cookies in the category "Performance".
viewed_cookie_policy
6 months
The cookie is set by the GDPR Cookie Consent plugin and is used to store whether or not user has consented to the use of cookies. It does not store any personal data.
Functional cookies help to perform certain functionalities like sharing the content of the website on social media platforms, collect feedbacks, and other third-party features.
Performance cookies are used to understand and analyze the key performance indexes of the website which helps in delivering a better user experience for the visitors.
Analytical cookies are used to understand how visitors interact with the website. These cookies help provide information on metrics the number of visitors, bounce rate, traffic source, etc.
Advertisement cookies are used to provide visitors with relevant ads and marketing campaigns. These cookies track visitors across websites and collect information to provide customized ads.