
PebblePad Support
Module leaders and tutors can guide students about their PebblePad assessments, including the submissions process and how to complete the contents of a workbook or ePortfolio. The TEL Unit can assist both tutors and students with PebblePad technical advice or support.

PebblePad Help Hub
PebblePad have their own Help Hub which provides additional guidance for Learners.
PebblePad is a student-centred platform which is used for the assessment of Portfolios and evidence-based learning.
The main area you will use as a student is Pebble+

All UW students and staff have access to PebblePad and the platform can be used for Academic or for Professional Development activities.
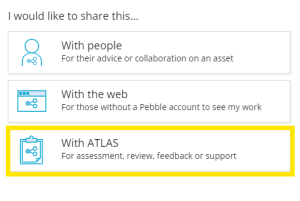
If you have been assigned a mentor or assessor when on placement, your practice assessor will also need access to PebblePad using a UW ‘External Assessor’ account.
Your module leaders will be able to advise you of the process to follow when submitting your assignments and when you need to share your Pebble+ assets (documents) with others when on placement.
Only an External Assessor share is the correct share type to use, when on placement. Please watch our ‘Sharing with External Assessors in PebblePad’ instructional video for further information.
PebblePad have additional guidance about how to create or check an External Assessor share in the link below:
Share an asset with external assessor | Learners – Using PebblePad : Help Hub
As a student you can access PebblePad, using your Universal log in, through a tile on your personal ‘MyWorcester’ / ‘MyDay’ page or via a link which your module leader has included within your Blackboard module.

Shortly before a module begins, PebblePad areas will be made visible to students at the request of module tutors. If you find that your PebblePad workspace is not visible, please contact your module leader in the first instance.
Your tutors create blank workbooks / ePortfolios and add these to your PebblePad workspace. In most cases students can work on their own version of a PebblePad document by firstly going to their main Pebble+ page.

Select ‘Get Started’, in the ‘Start working on…’ section.
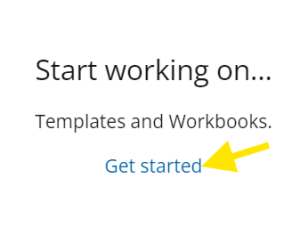
Your module leaders will advise you about all the details, but you will be able to find any ‘workbooks’ or ‘custom templates’ your tutors have made for you in this area:

Once you have found the document you need, selecting ‘Save’ for the first time, will add your own version of a workbook or template to your personal ‘Assets’ in Pebble+. From this point on, you will need to access this workbook from ‘Assets’ and you can continue to edit this, saving any changes as you go along.
N.B. When you find and select the workbook or template you need, you may see this message:

This means your module leader has set up the assignment to be automatically submitted to the workspace for assessment, so they can view your work. You will need to agree to the ‘terms of usage’ to submit your work to PebblePad.
Your module leaders are best placed to advise you about how to complete your assignment and how this should be submitted to the workspace.
Your module leaders are best placed to advise you about how your assignment has been set up. A resource might be set to Auto-Submit. This means that when you select the resource from ‘Get Started’ and Save it for the first time, it is automatically shared with the workplace and the following message will be shown:
You will need to tick and agree to the terms of usage to continue.
→ How do I share for assessment / submit my asset, if my workbook is not automatically submitted to the workspace?
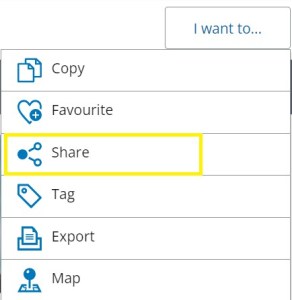
Your tutor will be able to advise you of all the steps you need to take. If you need to submit your work manually, you can use the ‘I want to’ button to ‘share’ your work to a particular workspace using the Atlas link.
When a workbook or eportfolio is shared with an External Assessor, an email link is sent to them. Once shared, students can continue to work on their book and External Assessors will be able to see these changes and edits.
External Assessors are only able to access the sections that are assigned to them and provide feedback. So, the fields you can access to edit (text boxes, tables, tick boxes) within your workbook, will not be the same as your External Assessor and vice versa.
Tutors will also be able to access your work to monitor progress.
When creating an External Assessor share you are advised to add an expiry date (which would typically be at the end of your placement). Please be aware that, once a share has reached the expiry date, your External Assessor will no longer be able to access and view your shared asset.
You will need to make an ‘External Assessor’ share; no other types of share will work. You are advised to never create personal shares (‘with People’) as the assessor will not be able to complete the required fields.
If you think you have accidentally made a different type of share please contact TEL, tel@worc.ac.uk, for further support.
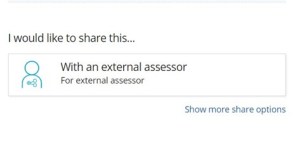
How to share with an External Assessor
To share your PebblePad asset, you can select the top right-hand button, ‘I want to… share.’
You will then be able to type in your External Assessor’s work email, using the following button:
You must input their work email address within the search bar, and click on the magnifying glass. Once they have been found, you can add a suitable expiry date and select ‘Share asset’.
However, if your External Assessor is not found, you may have the option to click on the text ‘Add a new external’. You can then add the details of your assessor here, but please ensure their work email address is correct.

This action will create a new UW PebblePad account for your External Assessor, and they will receive an email confirmation from PebblePad.
If you encounter any problems adding a new external, or are a ‘SOWK’, ‘PTHY’ or ‘OCTH’ student please feel free to contact us at TEL, tel@worc.ac.uk
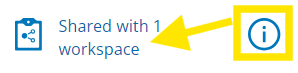
Once an External assessor share has been made, students can check a their share details by selecting the ‘Shared with 1 workspace’ icon to the right of their asset: Share an asset with external assessor | Learners – Using PebblePad : Help Hub
You can check your external assessor shares via the ‘i’ tab to the right of your workbook, or by clicking on the ‘Shared with 1 workspace’ icon highlighted in blue. Clicking on either will open the tab window.
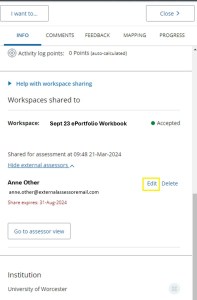
You can then scroll down to ‘Show external assessors’.

Click here and you will see the name and email of your assessor and an expiry date if you have used one. Expiry dates can be extended using the ‘Edit’ function and the date picker.
Other types of share can give a different view to the correct assessor view for a workbook. If you have made a share ‘with people’ to your assessor we recommend removing this. This different type of share will result in a ‘read only’ like version of your asset being shared. An incorrect share ‘with people’ can also influence your correct external assessor shares, so you will need to remove ‘with people’ shares for your assessor to view your work correctly.
A share ‘with people’ will show the following icon to the right of your workbook in your assets list:

If you click on ‘Shared with People’ icon you will be taken to this share, and you can select the trash can to remove this:
![]()
Please see PebblePad’s ‘with people’ guidance here about removing these types of share. (Only incorrect shares have a trash can next to them.)
You can then scroll down to bottom of the ‘Info’ window which has opened. There will be a drop-down section containing your correct External assessor shares which you will need to keep.
If you find that this does not resolve the issue, also contact us here at TEL, tel@worc.ac.uk. Please use your student email and provide us with the full name and email address of your practice supervisor so we can assist you both further.
Only work accounts are permitted, so personal email addresses should not be used when sharing an asset with an External Assessor. Please ensure you type your assessors name and email address correctly when making a PebblePad asset share.
If your External Assessor is not found, you may have the option to click on the text ‘Add a new external’. You can then add the details of your assessor here, but please ensure their work email address is correct.
This action will create a new UW PebblePad account for your External Assessor, and they will receive an email confirmation from PebblePad.
If you are a ‘SOWK’, ‘PTHY’ or ‘OCTH’ student or if you encounter any problems, please feel free to contact us at TEL, tel@worc.ac.uk
Sometimes an individual institution’s email filters can block PebblePad notification emails. You or your External Assessor should contact us at tel@worc.ac.uk, so we can assist further. Please ensure you send the full name and email address of your External Assessor or Student. (N.B. You should contact us through the same email address which your PebblePad account is linked to.)
Only an External Assessor share will permit your practice assessor to access your workbook correctly. If you have ever made a different type of share by mistake, this can result in a ‘read only’ version of your asset being shared. We would recommend checking that you have made an External Assessor share, as outlined in PebblePad’s guidance here.
If you find a different type of share called ‘with people’ we recommend removing this by using the trash can icon. Please see PebblePad’s guidance here about how to remove an incorrect share. You will need to keep only your External asssessor shares as shown in the example below:
If your practice supervisor is no longer able to see your asset, you should check the expiry date on your External Assessor share and edit as necessary.
If you need any further support, please also contact us here at TEL, tel@worc.ac.uk, from your student email, with the full name and email address of your practice supervisor.
We recommend checking your External Assessor share, as outlined in PebblePad’s guidance here.
You may need to open the ‘i’ tab window and scroll down to extend the expiry date on your current External Assessor share.

You can do this by choosing the ‘Edit’ option, next to your External Assessor share.
If you think you have accidentally made a different type of share previously you can remove incorrect shares. (Please see our guidance about removing ‘with people’ shares in our FAQ: I have accidentally made a share ‘with people’, what can I do?) Please also contact us here at the TEL Unit, tel@worc.ac.uk. We will need to know the full name and email address of your practice mentor / supervisor / assessor.
You or your External Assessor should contact us at tel@worc.ac.uk, so we can assist further. Please ensure you contact us using the email address your PebblePad account is linked to, and also send us through the full name and email address of your External Assessor / Student.
Your module leaders are best placed to advise you about how to share your work for assessment correctly. When an Asset is shared for assessment, it is submitted to a PebblePad workspace.
Sharing your work for assessment will ensure that your work is dynamically linked for viewing by tutors. When a document has been submitted for assessment, a blue bar appears across the top of the asset.

You will also be able to see a clipboard icon to the right of your asset. Click on the ‘i’ tab or the ‘Shared with 1 workspace’ icon to see all the details about where your asset has been submitted.
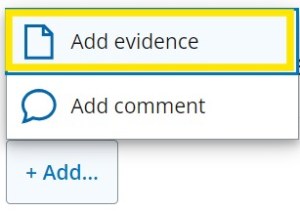
Evidence can be added to a Workbook or ePortfolio either by creating a link or by using the ‘Add’ button.
If you wish to link a document, you can highlight text within a workbook, then use the link icon, found in the text box functions, to create this. You should ensure the highlighted text explains or references the document which you are linking. For example, ‘Link to Practice Plan’.

Selecting the link icon will open a new window, where you can search for documents, if they have already been saved in ‘Assets’ / ‘Resources’, or a new document can be uploaded by selecting ‘More Items’ →’Upload New’

Please see a demonstration in the linked video here.
(N.B. If needed, it is possible to add web hyperlinks in a text box from here too, using the ‘Address’ option, and ‘Link Text’ gives the opportunity to explain what the internet link is for.)
Evidence can also be added, if an ‘+ Add…’ button has been included, and you can upload or search for assets by selecting this →’Add evidence’.

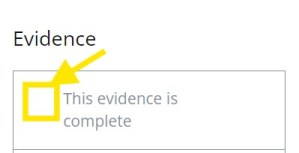
Once everything has been added, you need to select ‘Mark this Evidence as complete’ – by selecting the tick box and saving your work.
An asset which is shared for Assessment purposes, often has a due date. When a due date and time is reached a ‘snapshot’ of the PebblePad asset is taken for assessment. Any additions or changes which are made after this will not be seen by your lecturer / assessors.
The most common reason for this is that you have accessed the resources via Atlas (the blue globe) instead of Pebble+. You will need to select the green Pebble+ icon, (which looks like a person) to find your document from within your assets store.

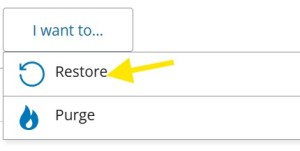
The deleted folder gives the option to ‘restore’ items if they have accidentally been deleted. This can be done by using the ‘i’ button / ‘I want to’ button’. However, users must be careful not to ‘purge’ the item, as this will permanently delete this. If an item is purged, it is not possible to restore this.
Once restored the asset will appear back in your personal ‘Assets’ folder.

Sometimes a ‘copy’ or ‘recovered’ version of your asset can be created. Normally this happens if you forget to save your work and then log out of PebblePad. If this occurs, you will need to check that you are working on the correct asset when you make changes, especially if you have shared your work for assessment. Your assessors and tutors will only be able to see changes in your work which has been submitted to a workspace.
If you have shared for assessment, the correct asset you should be working in will have a blue ribbon across the top and a ‘Shared with 1 workspace’ icon (highlighted in blue text to the right) in your assets list. You can also use the ‘i’ button to check all the details.
If you have accidentally been working in the incorrect version of your workbook / eportfolio, you will need to copy over any contents into the version which has been shared for assessment.
You can organise your assets in your folders and choose to remove an incorrect ‘copy’ or ‘recovered’ asset if this is not needed; after you have definitely transferred any work across to your correct, original version of your asset.