Building Your Course with Blackboard Learn Ultra
Before you begin to add content to your Blackboard Learn Ultra module, you will need to consider how you would like your course to be structured. Learn Ultra has been designed with a ‘learning journey’ approach, and works best when the course is designed to include progression through the learning materials.
The TEL team are here to advise you on how you can use the tools within Blackboard Learn Ultra to design an engaging and immersive course for your students.
Help Guides
Course design and structure
Best Practice
Creating content with effective design can enhance the presentation of your course material, making it more captivating and immersive. Skillfully crafted content can address various aspects:
- Facilitating Learning: How swiftly can a newcomer navigate through your course content while grasping the concepts?
- Enhancing Efficiency: Once students are acquainted with your course structure, how efficiently can they perform tasks?
- Ensuring Satisfaction: To what extent do students find enjoyment in engaging with your course content?
- Ensuring Usability: Can individuals with diverse abilities, experiences, knowledge levels, language proficiency, hardware, or concentration levels easily navigate your course?
- Promoting Accessibility: Ensuring that individuals with disabilities have equal access to information, services, and utilization as those without disabilities. Is your course equally accessible to everyone?
Additionally, effective design doesn’t necessarily entail complexity. A minimalist and straightforward approach can also be visually appealing while maintaining its impact.
Developing a well-designed course necessitates thorough planning. You must consider not just visual aesthetics but also writing style, tone, information organization, and accessibility.
Hints and tips for planning an effective course within Learn Ultra:
Organise Content Logically: Arrange your course materials in a logical and intuitive manner to help students navigate easily.
Chunk Information: Break down larger pieces of content into smaller, manageable chunks to enhance understanding and retention.
Use Descriptive Headings: Utilise clear and descriptive headings to help students identify different sections of the content quickly.
Provide Context: Offer context or background information for each piece of content to help students understand its relevance to the course.
Incorporate Multimedia: Enhance engagement by incorporating multimedia elements such as videos, images, or interactive activities to supplement text-based content.
Utilise Formatting Tools: Make use of formatting tools like bold, italics, bullet points, and numbering to emphasize important points and improve readability.
Provide Clear Instructions: Clearly communicate instructions for any activities, assignments, or assessments associated with the content.
Check Accessibility: Ensure that all course materials are accessible to students with disabilities by following accessibility guidelines and providing alternative formats if necessary. Click here for more information about accessibility
Encourage Interaction: Encourage student interaction with the content through discussion forums, collaborative projects, or interactive quizzes. Click here for more information about interaction.
Regularly Update Content: Keep course content up to date by revising and updating materials as needed to reflect current information and resources.
Course Banners
You have the option to upload an image for the course banner within Learn Ultras’ courses. The course banner is visible in the grid view on the ‘Courses’ page as part of the base navigation. The benefits of a relevant course banner include:
- Enhancing the appearance of landing pages in Ultra Course View.
- Offering a visual identity for visual learner students.
- Ensuring consistency between base navigation displays and the actual course content.
- Assisting students in identifying and locating course details effectively
Setting up a course banner
1. Choose an appealing and meaningful image for your course. The minimum size for the banner image is 1200 x 240 pixels.
2. Select the pencil icon on the default course banner panel.
3. Click on the ‘image’ icon.
4. You can now upload an image. JPEG and PNG formats are supported.
5. You can now position the image by clicking and dragging the guidelines to a suitable position. The slider will allow you to scale the image within the guidelines.
Learning Modules v Folders
Learning Modules and Folders are both ways of organising materials on an Ultra course. They can both contain Documents, Folders and other types of content, but they differ in a few ways.
Learning Modules are a special type of folder designed for collections of learning materials and activities. Students navigate sequentially through a linear structure, almost like an e-book, enhancing the ‘flow’ of reading and learning.
We recommend organising Ultra course materials within learning modules by week, topic, session, etc, as appropriate and maintaining this structure throughout the Course.
Learning Modules can have an image to enhance the visual appeal.
Learning modules can contain multiple Folders if it helps to organise large amounts of content but a Folder cannot contain a Learning Module.
When Progress Tracking is on Learning Modules will show the progress in the student’s view.
Folders are simply used to gather together multiple files in a single ‘container’. We recommend placing module-wide reference materials and useful resources in a folder as these do not need to be worked through sequentially.
Interactivity
Blackboard Learn Ultra has a number of interactive elements that can be built into your course.
Why use them?
- Utilizing interactive elements within your course, enhances student engagement and participation.
- Incorporating interactive features fosters active learning, encouraging students to interact with course content rather than passively consume it.
- Interactive elements promote retention and comprehension by providing opportunities for students to apply knowledge and skills in real-time.
- By including interactive components, you can create dynamic and immersive learning experiences that cater to diverse learning styles and preferences.
- These features also facilitate immediate feedback, allowing you to assess student understanding and progress more effectively.
Interactive Elements built into Blackboard Learn Ultra
Discussions
Journals
Conversations
Tests
Online discussions provide unique benefits. Because students can take time to ponder before they post ideas, you may see more thoughtful conversations. You can observe as students demonstrate their grasp of the material and correct misconceptions.
A sense of community among students is crucial for a successful online experience. With online discussions, course members can replicate the robust discussions that take place in the traditional classroom.
For smaller course groups, you can also offer group discussions where only members of the group may access the discussion.
Journals serve as private channels for students to communicate directly with you. They can also serve as tools for self-reflection, allowing students to share their thoughts, opinions, and concerns about the course or to analyse course materials.
You have the flexibility to create broad, student-directed journal assignments. This enables students to reflect on their learning journey, documenting shifts in their perspectives and approaches. They can detail challenges encountered and their problem-solving processes. Alternatively, you can assign more structured, instructor-directed journal entries, providing specific topics for discussion.
If you enable class conversations for individual content items, students can discuss the content with you and their classmates. They can ask for help, share sources, or answer questions others have. As the conversation develops, it appears only with the relevant content. Conversations don’t appear on the discussions page.
You can enable conversations for these content items:
- Documents
- Assignments
- Group assignments
- Tests
- Group tests
- Offline submissions
- Links to teaching tools
A Blackboard test allows you to create a test or quiz with a variety of question types that can be automatically marked (essay questions will require manual marking). The test tool has been rebuilt within Learn Ultra and has better functionality and user experience.
The following question types are available:
- Calculated Formula
- Calculated Numeric
- Essay
- Fill in the Blank
- Matching
- Multiple Choice
- True/False
Accessibility
Before constructing your course in Ultra, and as you design and develop content and activities in the online setting, it’s essential to prioritise accessibility. We must guarantee that our teaching and learning materials, our online platform, and our resources are accessible to all learners within our diverse community, and actively work to eliminate any obstacles that could hinder their ability to succeed. Learn Ultra has in-built functionality to help achieve this, in the form of ‘Ally’. This is built into all courses and organisations and will scan documents and images to provide you with a report on the accessibility of your content. Additionally, it creates alternative formats for the students to meet their personal needs or preferences.
Quick Start Guides
Creating a welcome video
Integrating a welcome video into your online course offers a number of advantages. Firstly, it provides a personal touch, allowing you to greet your students by name and convey enthusiasm for the upcoming learning journey. This personal connection fosters a sense of belonging and encourages engagement right from the outset. Additionally, a welcome video sets clear expectations, outlining the course structure, objectives, and important deadlines, thereby reducing confusion and anxiety among students. Furthermore, it humanises the online learning experience, helping to break down barriers and establish rapport between you and your students.
Tips for content in an effective welcome video
Avoid overwhelming students with excessive information. Opt for brevity and clarity instead. Keep your videos concise, ideally under three to four minutes. Consider when was the last time you remained engaged in an instructional video lasting longer than five minutes. If you have more content to cover, consider breaking it into multiple shorter videos.
Keep it brief and captivating. Aim to inspire and inform without inundating your students with details or specific dates. Inject personality by sharing glimpses of your life through photos or clips. What hobbies or interests occupy your free time?
Establish clear guidelines. Outline expectations for student conduct and participation, ensuring a harmonious learning environment.
Highlight important details. Include any special instructions or requirements, such as virtual class meetings, to ensure all students are well-informed.
Communicate availability. Specify your communication schedule and response times for emails and posts, as well as when students can expect grades to be accessible after deadlines.
Offer virtual office hours. Encourage students to reach out with questions or concerns during designated times, fostering a supportive learning environment.
Provide assistance resources. Direct students to available technical support services, demonstrating your commitment to their success.
Start with a guide. Offer clear instructions on how students can begin navigating your course effectively, providing a seamless introduction to the learning journey.
Creating course materials & documents
It is possible to add a variety of content to your course, including online lectures, lecture slides, weblinks and reading.
Creating Documents
Documents are a great way of presenting a variety of learning materials in a single place. For example you can add context for the lesson, lecture slides, images and video all within one page.
Batch Edit
Batch Edit enables faster updates to the visibility and dates of multiple content items. This feature is especially helpful when you need to modify the visibility or dates of numerous items at once.
- Click on the three dots icon on the right hand side of the screen. Select Batch Edit from the drop down menu:

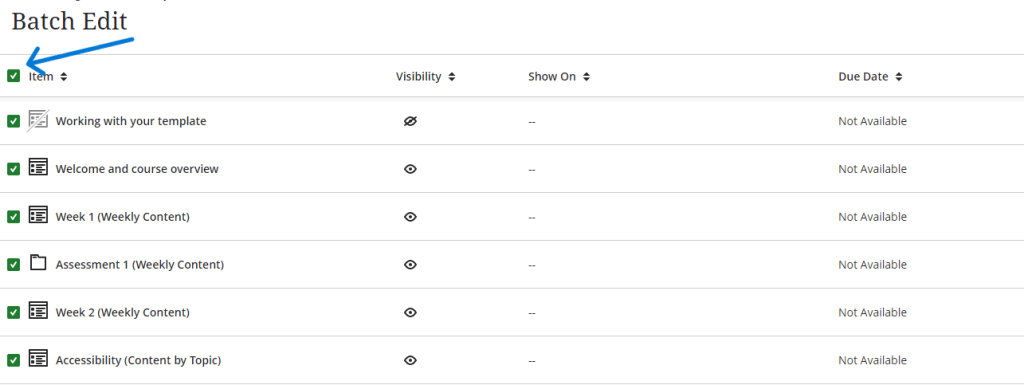
- You can then select multiple items by clicking the tick box next to each item. All items can be selected by clicking the top ‘select all’ icon:

- Select edit visibility at the bottom of the screen:

- Hide or unhide your content as required and click Save Visibility to confirm:

Content Market
The Content market allows you to add third party links to your course. These include PebblePad, Turnitin and Talis Reading & Resource lists.
- Click the Plus icon where you would like to add the tool link.

2. Select the tool link that you would like to add. NOTE: clicking the plus button next to the tool will add the entire tool (e.g. the whole Reading List); clicking the tool itself will allow you to launch and browse for content.

